A Simple Instruction
This hasn’t been majorly requested, but it has been requested as far as some one on one conversations with some people. I will eventually post a video of exactly how I go though this process – not including my face washing routine because who wants to see me look like a drowned rat? – but for now I think that this along with some photographs would work just fine for the moment.
Step One: Clean Surface
Before I start doing any makeup on my face, I thoroughly clean my face. If you’ve read my post about my morning/night routine for cleaning my face, then you know that I try to exfoliate twice a week. I also exfoliate if I plan on wearing makeup and my skin is looking a little flakey. Exfoliating will get that dead skin off to give you a soft reasonably flat surface to work with. So my typical steps to gain my clean surface are simple:
- Exfoliate both my face & lips
- Wash with normal cleanser
On days when I plan to wear makeup, I never use my little pore strips. They can potentially irritate my skin – at least they do mine on occasion – and it is truly counterproductive to keeping your skin calm when putting makeup on. If you want to do them, I highly suggest doing them at least twelve (12) hours prior to doing any of this.
Step Two: Moisturize
You guessed it, belles and beaus! Next I typically used my Ponds Caring Classic Dry Skin Cream in a really small amount. Yes, the more you use then the more your skin is moisturized, but if you’re like me and your skin is naturally oily, then you’re better off using very little. I also do my e.l.f.’s Illuminating Eye Cream during this as well just under my eyes. I give this about 30 minutes to let this all get absorbed into my skin, and more closer to an hour if I have the time. So I’ll usually touch up my nails or something during this time.
Step Three: Prime that Surface
Once my moisturizer has settled in, I start priming my face with NYX Cosmetics Pore Filler Primer. I typically put it all over, but I really focus on my t-zone and especially at my nose because these are the areas I tend to have the most oil when wearing makeup. But again, this is just like when moisturizing the skin. Less is more! I will typically do the same thing as I do with my moisturizer and let the primer settle into my skin for about 10-15 minutes.
I don’t do this though when I use my Bare Minerals BB Creme because it’s meant to moisturize the skin.
And on a side note, I promise I will eventually try some of NYX Cosmetics other primers and let you all know my opinions on them, but not until I get through this one I’m using now.
Step Four: Conceal & Foundation
We’re finally at the fun part! Or maybe I’m just a weird person for liking putting concealer and foundation on. Now here’s where the pictures come in handy.
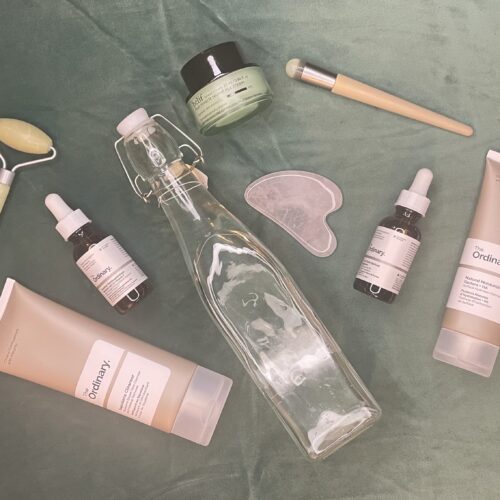
I begin by taking my NYX Cosmetics Hi Definition Photo Concealer Wand in Porcelain – shocker that this one works and not the alabaster colored one – and make a triangle under my eyes to cover up my un-godly dark circles. And no, it is not because I don’t sleep, belles and beaus.
As you can see, I then take a small dot of my Bare Minerals’ bareSkin Pure Brightening Serum Foundation on my index finger and gently dot it all over my face. Three dots for each cheek and forehead and then I do a couple on my chin, as well as straight down my nose from my forehead, two on the nose and then a couple at my cupids bow.
I start with my little beauty sponge that I got at Walmart and begin to blend my foundation in with the concealer. For two different products by the same color name, they actually blend scary well. I then take my Bare Minerals Perfecting Face Brush – it is made for the foundation I use – and, in a circular motion, blend the rest of my foundation into my skin.
Step Five: The Eyes
Now I’m just giving you all my simple makeup routine. I give Jeremy Renner all the credit for my creation of this because he has very simple rules as our resident Avengers’ Makeup Artist – yes I totally just made that up.

Laugh all you want, but I live by his rules on my easy makeup days. I just don’t do them in the order he says.
So eyes, I just toss on my favorite mascara which you all have already heard me rave about in my last makeup round up post. I simply apply my NYX Cosmetics Doll Eye Long Lash Mascara. I’m sure he means to also do eyeliner, but ya’ll, you don’t have time for liner if you’re going to a five minute look unless you’re one of the makeup goddesses on YouTube. I can’t so I don’t bother with eyeliner.
Step Six: Brows
I don’t always do this step. Jeremy forgive me! But I recently got fitted for my Benefit Precisely, My Brow Pencil Ultra-Fine Shape and Define in Shade 2 – my first brow pencil – thanks to a lovely woman who works at Ulta. I adore my pencil because it’s small. The size makes it amazing for making hair like strokes and I love how my eyebrows look after it. I also use NYX Cosmetics Tinted Brow Mascara in the Blonde shade after I’ve filled in my brows with my pencil. It helps my hairs sit down and locks them in place for the day.
I have been tempted to try pomade but I’m kind of on the fence with it. We will see sooner or later.
Step Seven: Lips
My last step is my lips. I always line my lips with whatever color I use, but I also use Rimmel London Moisture Renew Lip Liner that is actually invisible. I do it on the outside of my lip color so that it limits the amount of feathering and bleeding I deal with. My lip colors vary so I’ll do a whole post at a later time for all my lippies and sharing my favorites with you all.
I know this seems like a crazy amount of things to do, but you have to remember I don’t always put my makeup on right after I get my face clean. So the actual makeup routine takes anywhere from five to ten minutes, depending on if I decide to go a little more in depth with my eyes. So it’s a super easy routine to do.
What’s part of your simple makeup routine? Feel free to leave your tips and tricks in the comments!
XOXO,

Trula Marie